Friday, October 22, 2021

 Fort Worden State Park, Port Townsend, WA.  March 23-25, 2021

Tuesday, March 23, 2021

9412 miles at start.

Drove to Port Townsend to camp at Fort Worden- 2 nights reservations site 48, full hookup $88 includes web reservation fee and 2 nights.  Took the 10:15am Coupeville to Port Townsend ferry.  Left home at 9:00am, arrived 9:20am.  Ferry toll $39.05 including -1.80 senior discount (65+) for Janet.


Drove through Port Townsend and toured Point Hudson RV Park and Marina.  Lunch takeout from Shanghai.  Lunch specials twice cooked pork and Shanghai chicken- ate in RV at Point Hudson.  Watched noon news on Channel 7 after channel scan at Point Hudson. 


Drove to Port Townsend Safeway and bought local Sunrise Coffee, roasted in Port Townsend.  Also bought canned green beans and ice cream.  


Drove from Port Hudson to Jefferson County Oak Bay campgrounds in Port Ludlow.  Both are closed for the season, opening April 1, and have very small minimally improved campsites (picnic table and fire ring) with no privacy.  


Drove to Fort Worden State Park, registered in the office and then set up camp in site #48.  This is a pull through full hookup site with privacy on the passenger side which backs to woods at the base of the bluff, but there is a bluff trail very close by.  The public restrooms are well appointed and maintained.  There is a single ADA shower stall, $1.00 for 3 minutes.  


Used levelers on driver side 2” front and back. Connected water and power.  Got bikes down and assembled. Rode the bikes around the campground and to the light house, then to bike rack at Knapp Circle trail where there is beach access.  


Walked 4.6 miles round trip along North Beach from the Knapp Circle Trail beach access.  Found only 8 small agates, along with some small beach glass pieces. 


Spaghetti with canned Hunts sauce, Costco frozen meatballs and frozen green beans for dinner with some carrot sticks, celery sticks, Boursin’s cheese and Ritz crackers for dinner.  Used both propane burner for sauce and induction for noodles.  


Hot showers after dinner.  Grey tank 1/3 after showers.  Propane 3/4, fresh water 2/3.  Black empty.  


In bed by 9pm.  Calm outside 49˚F.  


Wednesday, March 24, 2021

9451 miles, Fort Worden State Park Campsite 48.

Oat meal with raisins and milk for breakfast.  Walked the bikes up the Beach Campground Trail- moderately steep with several hundred feet of elevation gain to top of bluff.  Rode the bikes around the Artillery Hill Main Gun Line road, Battery Way and Mule Barn road to Chinese Gardens interpretive trail.  The last was a narrow dirt trail with tree roots, difficult to bike, along the Chinese Gardens Lagoon.  Had light rain on and off while bicycling.  Returned through main campus to the campground via the Parade Ground road.  Had Tonkotsu instant ramen bowls for lunch with Ritz crackers and Boursin cheese.  Naps. Moderate winds caused the slide cover to flap a bit in the wind and rain. Need waterproof seat covers for bikes (shower caps?)


Late afternoon, rode the bikes to the North Beach County Park along the roads around the park, encountering moderate local traffic.  Rode past the Fort Worden Cemetery and Port Townsend water treatment plant.  Locked up the bikes at the County Park and walked west along North Beach for 2.25 mile round trip.  Janet found 3 agates, Ben picked up just beach glass.  Rode bikes back via the North Beach Trail through Fort Worden State Park past the Chinese Gardens trail, and back to the campground.  Bicycled about 5 miles in the afternoon.  


Chili Cheese dogs with nachos, carrot and celery sticks for dinner.  Watched an episode of Giny and Georgia on Netflix and then showers and bed by 10pm.  Rain started during the night, but with less wind.  


Thursday, March 25, 2021

9451 miles, Fort Worden State Park Campsite 48

Egg and Cheese sandwiches made with Costco Sandwich buns toasted with Boursin’s spread in the convection oven, and egg with shredded cheddar omelet made on the induction cooktop in the skillet. Discovered it is not possible to run the Microwave and Induction cooktop simultaneously- the Induction cooktop shuts itself off and takes several minutes before it will reset and come back to standby status.   


Use the campground toilets after breakfast and then broke camp by raising the stabilizing jacks, disconnecting fresh water after topping off the tank, drained and flushed the black tank, then drained the grey tank, and then power flushed the hose.  Stowed the hose and adapter capped in the new bumper storage, and used the green bucket with 4oz holding tank treatment and 1.5gal water to add to the black tank via the toilet.  Then rinsed the green bucket and used that to store the coiled green hose in the wet bay, along with the potable water hose in its caddy.  Drove the RV off the leveling blocks and ran the slide in.  Stowed the leveling blocks In the Wardrobe external compartment.  Bikes were secured to the rack the evening before.  It was raining so we decided against doing any more bicycling.  


Drove to North Beach County Park, but it was high tide and raining, so we opted to catch an earlier ferry.  We were able to catch the 11:15am ferry on standby and were the last vehicle loaded.  We decided to check out Maxwelton Beach via Dave Mackie Park.  Stopped and had lunch special takeout in our RV at China City Freeland.  Better than Shanghai, but not as good as China Harbor or Chiang’s.  


Dave Mackie Park was 1/4 mile past the location tagged on Apple Maps, which was a private stretch of beach with a beach volley ball court.  Dave Mackie Park had two parking lots, a closed bathroom and children’s play area.  The beach is closed on either end by private tidelands and NO TRESPASSING signs, so there is less than .25 miles of beach that can be walked, and there was no gravel for agate hunting.  Double Bluff was visible in the distance, so we drove there.  The county has installed a small parking lot with a narrow turn around.  We were lucky to be able to park and get out.  We walked a mile down the beach and came back- it was high tide and Janet managed to find one yellow agate.  Lot’s of dog walkers and dogs.  


We drove to Ebey’s Landing and parked along the beach for a short nap and then walked about 1.5 miles south and back as the tide was going out and the sun was setting.  We found a couple of small agates, and then drove home.  We unloaded perishables and laundry- pulled sheets off the bed, pillow cases and towels.  Used the Dyson to vacuum before unloading that as well.  


Our First RV Camping Trip- Ocean City State Park, March 15-18, 2021

Our First RV Camping Trip in the Winnebago View- Ocean City State Park: Pacific Coast of Washington State, March 15-18, 2021

Monday, March 15, 2021

8820-9068 miles

First RV camping road trip.  Destination: Ocean City WA State Park campground.  Left Oak Harbor 10am.  Stopped at Lacey Costco (8968 miles) at 12:40pm to fill up on diesel. 13.5gal @ $2.999. (Since last fillup calculated 14.2mpg).  Costco Hot dogs for lunch.  Arrived at Ocean City State Park at 15:30.  Advanced reservation made on WSParks website. $113 for 3 nights for full hook up (30A, water & sewer) site 138.  Pull through site with picnic table, fire ring and small area for a tent.  Site was nice and dry.  Some sites in the park are flooded. 


Walked to beach via trail with many detours due to swampy areas and over dunes.  Cars were parked on the compacted sand on the upper tide line.  Walked for half an hour and returned to the RV to check out Damon point.  15-20 minute drive from state park to Damon Point via Ocean Shores.  2 lane 25-35mph roads for the most part.  There is an Indian owned private RV park right at Damon point, but the gate was closed and there was nobody at the office.  There are a number or RV’s there, but it is mostly a large parking lot with RV hookups.  No trees, picnic tables, etc.  There was plenty of public parking available at Damon Point.  The tide was receding, but the beach is largely fine grey sand.  We did eventually encounter some gravel at the very end of the spit, 2.25 miles walk one way, where we were able to find agates as the sun was setting.   


We returned to the state park and parked the RV using 3 layers of blocks on the driver side to level the slide, and connected city water via pressure regulator and filter, and 30A power.  


Dinner- Costco roasted chicken with baguettes and Boursin cheese, grapefruit.


Watched CBS evening news streamed on Apple TV over 1 bar AT&T  LTE iPhone personal hotspot at campsite.


Took long hot showers- discovered knob on shower oddly installed and control not intuitive.  Removed knob and reinstalled so that full counterclockwise is OFF, 1/4 turn clockwise HOT, full clockwise COLD. Continuous hot water maker works well, although it takes a little time for the hot water to reach the shower initially.  After two hot showers, the tank gauges show grey water at 2/3.  Used toilet ad lib since sewer hookup is available, but will only hook that up just before we leave, unless the tanks fill up earlier.  


Turned into bed at 10:30pm.  Will try to hit the beach early for the morning low tide.


Tuesday, March 16, 2021

9068 miles start

Broke camp by disconnecting power and water, and picking up leveling blocks.  Noticed some difficulty with getting the bed to lower smoothly or raise smoothly.  Careful inspection revealed some extra webbing associated with the bed lift mechanism was wrapped around the drive shaft and web spools.  I had to partially lower the bed to expose the webbing and then resecured the ends so that they would not get tangled with the driveshaft mechanism.  This fixed the bed mechanism.  The slide was run in and we drove to Damon point at day break, having coffee, tea, donuts and bananas for breakfast.  We hiked all the way around Damon point, finding most agates only at the point, but a couple of large ones were found on the east side of the spit.  This was over 6 miles hiking.  We then drove the RV onto the sand at the ocean access by the entry to Ocean Shores.  The access had just had some gravel added and drainage channels on either side dug by a grader.  The surface was soft- not yet compacted by many other cars, so the RV felt like it might get bogged down in a few spots.  I kept it going at a pretty good clip to maintain momentum, and we made it to the hard packed part of the beach.  Driving on that was no problem.  We parked and had lunch and long naps after running the slide out.  The solar was able to fully recharge all batteries, even after running the microwave to warm up chicken sandwiches.  


In the afternoon we drove back to Damon Point and did an evening walk to the end of the Point, and got another handful of agates as the tide was receding, but low tide was long after dark.  We drove back to the Ocean City State Park RV site and reconnected power and water after leveling with blocks and running the slide out.  Dinner was Mac & Cheese with canned green beans and chicken breast meat done in a saucepan on the induction cooktop, followed by a half grapefruit and some peanut M&M’s and smokehouse almonds for dessert.  Watched the CBS Evening news streaming on the AppleTV.  In bed by 10:30 after hot showers.  After showers, fresh water tank reading 1/3, LP 1/4, Grey Full, Black 1/3


Wednesday, March 17, 2021

9096 miles start

Refilled fresh water via tank fill valve, then broke camp.  Drove to Damon Point to hunt for Agates on the morning low tide.  Was at 1.8ft at 9am, low at 1.1ft at 10:10am.  Ben had coffee heated in microwave on solar/battery/inverter.  Voltage dropped to 11.7v on battery while microwave was running, but back to 12.5V with microwave and inverter off.  Overcast early morning sun. Chassis charger has usually show red indicator on and green indicator flashing which means battery is at >80% charge.  Flashing red indicator means battery not connected (disconnect relay active) while solid green indicates fully charged battery with float voltage maintenance.  


Latch on upper pantry got stuck in the pressed in position, not locking the door.  This was fixed by unscrewing it from the cabinet and spraying some WD-40 in the mechanism, then reattaching it to the door.  It had appeared to have been jammed because it was screwed too tightly to the door.  Normal function restored.


Filled up propane at Arrow Lumber in Ocean Shores, 4.4 gal @2.99/gal. Tank gauge reads 3/4 on direct read and on panel.  Returned to campsite and hooked up sewer hose, power and water.  Drained black tank and then power flushed black tank until  clear.  Black tank valve closed. Then drained grey tank.  Back flushed, then closed grey tank valve.  Capped RV sewer outlet and end of flushing adapter.  Flushed hose with flushing adapter.


Lunch Tonkatsu Ramen with chicken.  Had trouble lowering bed- trouble shooting revealed wiring harness plugged into back of the bed switch had pulled partly loose so that the connection for the deploy motor was only making intermittent contact.  This was fully plugged into the switch and secured with electrical tape.  The bed functioned fully after this.  Took naps.  


Returned to Damon Point at 4PM to hunt for agates as the tide receeded, but only found a handful of small agates.  


Returned to Ocean City State Park at night fall only to discover a Camper had parked in our site, and nobody was home.  We got a list of open campsites from the campground host and parked in 143 instead.  This is a back in site, but it was easy enough to get backed into and was a little more level.  


Dinner- chicken noodle casserole made with cream of mushroom soup, milk, chicken breast, and canned corn.  The saucepan in the RV is just a little small to cook the portions we’re used to, so a larger induction compatible saucepan would be desirable.  The cream of mushroom also burned on the bottom- need to avoid high heat on the induction with cream sauces.  


Thursday, March 18, 2021

9137 miles start

Rain started during the night.  Broke camp at 8:15am after coffee, oatmeal, tea, donuts and bananas for breakfast.  Drove to Damon Point.  Only one other truck parked there in the rain while DNR personnel were servicing the porta-potties.


Walked out to the point and hunted for agates in light intermittent rain and heavy overcast.  Came back with just a handful of small to medium agates on our last hunt.


Returned to the State Park and used the water and sewer hookups to drain and flush the tanks again, leaving them clean with grey and black tanks empty, fresh water full.  


Drove to the Ocean Spray Corporation headquarters in near Westport, but they have discontinued visitor center operations/tours.  Had lunch in the parking lot of the Ocean Spray headquarters with microwaved canned chili and nachos with cheese and salsa.  Tried to run the microwave on the inverter, but it shut down with an overload before we realized that the space heater was still turned on and was running off the inverter when the microwave started.  Will make a label to place by the Inverter power button to remind us to make sure the space heater is off before starting the inverter.  


Ran the generator for about 10 minutes.  Meter reads 13.6hrs.  It takes nearly a minute after pressing the auto start button for the generator to actually fire up, and about another 30 seconds for it to stabilize and switch over the power.  Next stop Lacey Costco for diesel and shopping.


9246 miles at Lacey Costco fill-up.  The price of diesel had gone up from $2.99 to $3.05 in just 3 days.  Took 17.869gal.  (Since last fillup, calculated 15.6mpg) A couple was intently looking at our RV in the parking lot when we came out of Costco with groceries.  We gave them a walk through.  They were just about to place an order for a similar RV but had not had the opportunity to see this layout.  


Next stop Chiang’s Gourmet on Lake City in Seattle for dinner in the parking lot with Ciara.  


Next stop Smokey Point rest area for bathroom break and to wipe off drops on the rear view camera which was causing headlights to form a bright blob in the center of the rear view mirror display monitor.  Created temporary hood with duct tape to see if this might help.  This did improve the performance of the rear view mirror camera.  I will fabricate a more permanent shroud or hood for that camera and will try to find some Rain-X to treat the lens with.


9373 miles Last stop Swinomish Casino Chevron for fill up.  $2.99/gal, took 7.801 gallons.  (Since last fillup calculated 16.3mpg).  Arrived home, 9397 miles on the odometer. Plugged in shore power.


RV Modifications Part 6- Chassis Battery Charger

 October 22, 2021

RV Modifications Part 6- Chassis Battery Charger

Most class C RV's have 2 separate 12V electrical systems.  There is a chassis 12V battery which is used to start the motor and operate all the chassis 12V electrical equipment including the headlights, entertainment system and anything else normally associated with an automotive cab.  There is a second electrical system that serves the coach part of the RV which provides power for the refrigerator, lighting, furnace, fans, TV and other accessories.  The coach electrical system includes a pair of deep cycle batteries for energy storage and shore power transfer switch to operate AC appliances and the 12V charger and inverter while plugged into shore power, generator and solar power systems for providing AC power when not plugged in at a campground.  All of the batteries, whether chassis or coach, are subject to continuous loss of charge due to electrical loads, even when apparently sitting idle.  Many of these "ghost" loads come from electronic devices like engine control computers, entertainment systems, USB power outlets, carbon monoxide and smoke detectors.  Over time, without charging, these batteries will slowly discharge and end up dead.  

The solar charger in the coach is very helpful in this circumstance.  Any time the RV is exposed to daylight, the solar charger generates electricity which recharges the coach batteries and provides power to run the refrigerator and other loads.  Unfortunately, the solar charger in the coach does not provide power to recharge the chassis battery, which is responsible for starting the motor.  

Our Winnebago View 24D did not come with any sort of charging system for the chassis battery.  For long term storage, most people would use a clip on battery maintainer to keep the battery properly charged.  One popular option in RV Forums was a device called the TRIK-L-Start which was basically a battery combiner which would connect between the coach and chassis batteries.  When a charging voltage was sensed on the coach battery (over 13.3V), a relay would then connect the two batteries.  This would allow the shore power or solar system that was recharging the coach batteries to also charge the chassis battery.  However, the device inexplicably became unavailable and some internet sites were really gouging the price, selling it for over $100 when it was originally a $35 product.  There are many other battery combiners available for RV and Marine use, but these are also expensive.  

My solution was to use a battery charger/maintainer that I had on hand (Deltran Battery Tender Plus) plugged into one of the coach AC outlets, and connected to the positive battery terminal via a simple 12V SPST normally closed automotive relay triggered by the ignition circuit.  The Deltran Battery Tender Plus is a smart battery maintainer which senses and adjust charge rates to prevent overcharging, and can safely be left connected for float charging indefinitely.


There is a fuse box on the outside of the driver seat pedestal that has circuits that are direct wired to the battery and also connected through the ignition switch, so it was easy to route the Battery Tender Plus's charge directly to the battery, and to tap into the ignition circuit to operate the relay.  

I used a self tapping screw to provide a common ground behind the driver seat and mounted the Battery Tender under the cab-over cushions so that the charge status could be easily seen from inside both the cab and coach.

When the chassis ignition is turned on, the relay disconnects the charger from the battery, preventing any potential problems with the chassis charging system when the ignition system is on.  Under most circumstances, the AC outlets will only be energized when the chassis is parked and either plugged into shore power or when the power inverter is turned on to operate AC appliances in the coach.  But there may be instances when the inverter is left on while the RV is underway, so having the relay disconnect the charger from the battery is the safest way to configure this.  Cost-wise, the relay was only $2.40 on eBay (5 for $11.99 with free shipping).  The Deltran Battery Tender Plus was $40 at Costco.  

With this system installed, we shouldn't have to worry about ever having a dead starter battery so long as there is sunlight, shore power, or LP for the generator available.  

Thursday, October 21, 2021

RV Modifications Part 5- Front Parking Sensors

October 21, 2021

RV Modifications Part 5- Front Parking Sensors

Our 2020 Winnebago View 24D was built on an "Limited Edition" VS-30 Chassis, which should really be called the "Economy" version.  It is fitted with manual vinyl seats, and the 7" entertainment system display.  It has a standard cruise control, not an adaptive cruise control, but does have active lane monitoring and back up camera.  One thing it doesn't have is front parking sensors.  The driver seat position is pretty high with excellent visibility from the cab, but it is hard to know exactly how close things are to the front bumper, and like most large vehicles, it has quite a blind spot directly below the hood line.  Higher versions of the VS-30 Chassis that have the adaptive cruise control and 9" entertainment screen have front parking sensors.  To avoid inadvertently damaging the very expensive plastic bumpers on this Sprinter Chassis, I installed aftermarket parking sensors. 


These were pretty easy to install after having previously figured out how to disassemble the upper dash board panels and trays.  The secret is you have to pry off the tweeter covers in the front corners of the dash to access T20 fasteners that hold all the rest in place, and to disassemble from the outside towards the middle tray.  I had previously figured out the passenger footwell fusebox for power access and the grommet in the firewall in the passenger footwell to pass wiring from the cab to under the hood.  


The one caution I would have to advise anyone undertaking this same task is to make sure that you mount the sensors with the correct orientation.  The sensors do not have a conical beam.  It is flattened like a fan so make sure the "UP" mark on the back of each sensor is installed in the UP position, otherwise they will falsely alarm all the time as they pick up the road surface.  

Also, make sure to wire the power to the sensors through a dash mounted power switch so that they can be left turned off when not needed.  I discovered that rain and other noise can cause annoying false alarms while driving out on the open road.  


RV Modifications Part 4- External Sewer Hose Storage

 October 21, 2021

RV Modifications Part 4- External Sewer Hose Storage

The 2020 Winnebago View 24D has several external storage compartments below the coach and one storage compartment below the bathroom coat closet.  There are a pair of opposing compartments in the middle of the coach that actually connect across the top of the storage space with a 6" tall passage that can accommodate long items like beach umbrellas and folded fishing rods.  At the rear of the coach are two more compartments that are a bit smaller and slope upwards towards the rear bumper for ground clearance.  The driver side compartment houses the utilities for the coach which include the fresh water fill and drain controls, holding tank valves, external shower, Automatic power transfer switch and surge suppressor, rear jack controls, and connections for satellite dishes, cable TV and external solar panel.  On the passenger side the rearmost compartment is available for general storage.  

When RVing, there are things that tend to be wet- potable water hoses and filters, utility hoses for purposes other than handling potable water, and sewer hoses and connectors.  In general, it is best to keep your storage compartments as dry as possible to prevent mold and corrosion.  

The first owner of this RV had used the passenger side rear compartment to house the potable water hoses and external power cables, while using a general purpose tote to hold the coiled sewer hose in the main compartment under the coach on the driver's side.  This configuration is sub-optimal because it introduces not only moisture, but also undesirable odors and potential biological contaminants to the largest storage compartment in the RV which also communicates with it's passenger side sibling. Also, during camping, the slide out containing the dinette and bed slides out directly over this compartment, making access even more difficult- requiring crawling under the slide out to access.  

I was frankly surprised that this RV didn't have some sort of dedicated storage for the sewer hose that provided for ventilation and drainage.  Most travel trailers and many other RV's use a storage bumper for this solution.  In this case, the bumper on the View is simply a fiberglass fascia panel with reflectors and paint covering the end of the chassis frame.  I can only speculate this was to save on the over-all length of the RV so that it could be advertised as being under 26' in length.  But even the roof access ladder extends a few inches beyond the fiberglass "bumper".  

My solution was to manufacture a storage bumper.  RV sewer hose storage tubes can be purchased already made for about $50, but these frequently can't store couplers and accessories that aren't the same diameter as the sewer hose.  These also scream "I'm a Sewer Hose Holder!" when you see them.  So I purchased a square vinyl fence post and mounted it to the fiberglass "bumper" fascia just under the bottom of the roof access ladder with self tapping stainless screws and spacers.  I secured end caps with custom pins bent from aluminum rods and drilled to accommodate tiny padlocks to keep everything secure.  To top it off, I found an LED indicator strip that connects to the trailer towing 7 pin connector that repeats the tail light functions while also adding sequential turning signals for additional visibility. I attached that to the bottom of the storage bumper.


It is spacious enough to accommodate a standard expanding 15' hose with an attached 90˚ end adapter on the terminal end and clear flushing attachment on the RV end so I can monitor the appearance of the drainage and flush out the hose without getting splashed.  There is even enough room to store a 10' expanding extension sewer hose if a particular situation requires more than the usual 15' hose, and a cone adapter to fit most RV dump drain pipe sizes.  This places all of the sewer hose accessories exactly where they need to be for quick and efficient set up and clean up.  The clear flushing adapter I use has an end cap that can be attached to make it a completely closed system after it is detached from the RV, so there is no chance of getting sprayed with splash back while hosing out the hose before putting it up for storage back in the bumper.

Since many RV dump sites don't have garden hose fittings on the hoses used for cleaning up around the dump sites, I have fitted the external shower with a check valve (to prevent contamination of the RV's potable water supply) and hose fittings that I can use to flush both the black tank (via the built in black tank flusher) and the sewer hose (via the clear flushing adapter and cap) when the dump site does not have garden hose fitting compatible plumbing available.

To complete the optimization, I designated the rear passenger side storage compartment the "wet bay" for hoses, filters and other wet items. I drilled several drainage and ventilation holes in the lowest part of the compartment so that things can drain and dry out.  The electrical extension cables can now reside in the main storage compartment since they are dry and relatively clean items. 

RV Modifications Part 3- Solar Panel Expansion and Modification

 October 21, 2021

RV Modifications Part 3- Solar Panel Expansion and Modification

Our 2020 Winnebago View 24D came standard with a Zamp 30A Solar Charge controller and two SunPower 100W flexible solar panels installed on the roof with an open plug on the roof and a second open plug in the utilities bay to connect additional solar panels.  The main electrical consumer to worry about on boon docking trips is the refrigerator/freezer which draws 65W in normal operation mode. Having solar will allow the sun to power the refrigerator during daylight hours and hopefully enough solar energy can be stored in the dual 105Ah flooded cell coach batteries (210Ah combined) to run it through the night and during periods of poor lighting.  

Our kids gave us a SunPower 110W flexible solar panel for Christmas, which was a cosmetic match to the existing SunPower 100W panels.  


Winnebago and most manufacturers that use the SunPower flexible solar panels simply glue them down onto the surface of the roof.  This is inexpensive and easy to do, but comes with some inherent problems.  Besides dirt and corrosion, heat is a mortal enemy of solar panels.  Even though the SunPower flexible panels are frequently mounted in this manner, the documentation that came with the new SunPower 110W panel plainly states "Care should be taken to provide ventilation behind or underneath the modules, especially in hot environments."  Searching the internet and reading about other people's experiences with these solar panels, it is clear that some people only get 2-3 years of use out of these panels, while others see many years of reliable service.  I suspect the way they are mounted can significantly effect longevity.  

Not only does mounting the panels directly onto the fiberglass roof of the RV prevent ventilation and cooling for the panel, but it also transfers the heat directly to the RV roof, increasing the heat load that the air conditioner would have to deal with.  It would be ideal to mount solar panels with a distinct air gap between the panels and the actual roof of the RV.  That way, not only will air convection cool the panels, but the panels will also cast shade on the RV roof, further reducing the solar heat load for the air conditioner to deal with in hot environments.  

So I set about manufacturing extruded aluminum frames to provide rigidity to the flexible panels and mounting brackets that would allow the panels to be removed for service or replacement without damaging the fiberglass roof of the RV.  I had to cut the silicone sealant used to glue the panels to the roof using some Spectra fishing line tied between dowels.  This allowed me to remove the panels without flexing them, which might have damaged them worse than the heat might have if I left them as originally installed.  I cleaned the roof and repaired all the holes where screws were used to secure the panels to the fiberglass roof with epoxy and fiberglass.  


Once all the frames were manufactured, I mounted the panels in the frames and then mounted all the frames on the roof.  I also tidied the electrical wires into flexible cable conduits for UV protection and to reduce wind noise and vibration.


The solar panels seem to do a pretty good job of keeping the batteries charged.  The Zamp Solar Charge Controller shows the battery charge status in real time.  So far, during trips, the battery stays more than 3/4 charged unless we use the 2000W Inverter to power the microwave, toaster or induction cooktop to prepare meals.  After using the coffee maker and toaster in the morning, it takes 2-3 hours in the sun to bring the battery back to full if we unplug from shore power before breakfast.  If we start the night with full batteries but no shore power, by morning, the batteries will drop to about half capacity from running the refrigerator, TV, furnace, hot water maker and lighting.  If it's sunny, the battery will be back to full in about 4 hours.  

We also have a Cummins LP generator to supply electrical power when needed, but the solar panels are adequate to maintain the batteries for everything except cooking with the induction cooktop and microwave.  As our flooded cell batteries age, we may eventually replace them with lighter and potentially higher capacity Lithium Iron Phosphate batteries, but these are very expensive (close to $1K each) now.  Hopefully the price will come down in the next year or two as more lithium battery production comes on line.  The Zamp Solar Charge Controller and Zantrex inverter can be easily reprogrammed to work with Lithium batteries, as well as flooded cell and AGM batteries.  While the Amp-hour ratings for Lead-Acid and Lithium batteries are similar, the lithium batteries are about 60% the weight, and supposedly the lithium batteries can be much more deeply discharged without damaging the batteries.  Lithium batteries also can recharge more quickly than lead acid, so they may be inherently better for use with solar chargers.  That will be most likely be an upgrade that will come in 3-4 years, if we end up with typical life expectancy from our current flooded cell group 31 batteries.  

RV Modifications Part 2- Rear view camera system

 Wednesday October 20, 2021

RV Modifications Part 2- Rear View camera system


Driving a class C RV is different than driving a normal passenger vehicle.  It is wider and longer than normal passenger vehicles, so it is of critical importance to be aware of what and who is around you, both on the road and around the campsite.  Most class C RV's are equipped with extended rear view mirrors attached to the forward pillars of the chassis cab.  These allow you to see beyond the "shoulders" of the RV that bulge out from the sides of the RV behind the chassis cab. These also have wide angle fun house mirrors to help you spot vehicles in your larger blind-spots.  But what most class C RV's don't have is a functioning rear-view mirror.  Of course, if you look at the chassis cab, there is a rear view mirror mounted on the windshield, but from the driver's seat, usually all you can see through this is the inside of the coach.  Knowing if there are vehicles immediately behind you, and what may be going on with items you have attached behind your RV (Bike racks, tow-behind vehicles or trailers) is extremely important for safety.

When I drove the RV initially, I kept looking into the rear view mirror out of habit, and every time I did so, I wondered why this couldn't be a true rear view.  So I hit the internet and it didn't take long to find several rear-view camera systems with  a display that either replaced or fit over the factory rear view mirror.  

Adding a rear view mirror system is a much more complicated modification than adding a tire pressure monitoring system.  Prior experiences with rear view monitor systems has shown many to be prone to radio interference and noise.  These can cause static or complete disconnection of the monitor from the camera unit, even with the newest systems on the market.  There are simply too many devices sharing the limited bandwidth of the radio frequency spectrum that these monitors use.  So I decided to use a system with a hardwired camera.  Since most of the rear view monitor systems on the market are designed for passenger vehicles, I had to find one that could accommodate a much longer camera to display unit cable, one at least 30' long, or one that could accommodate extension cables.  

Another factor to consider is we usually have something in our 2" hitch receiver- either a bicycle rack with bikes, or a cargo carrier, both of which can block the normal license plate mounting position.  We also wanted to minimize the need to tear things apart to run wiring or mount equipment.  A rear view camera simulating the actual view a rear view mirror would show would also require different mounting than the back up camera that is standard equipment with this RV.  The backup camera displays on the 7" multifunctional display for the Sprinter chassis entertainment system, but only turns on when the RV is placed in reverse, and the camera angle looks down at the area immediately behind the RV, rather than outward towards the rear at traffic nearby and in the distance.  For these reasons, I decided to create a flexible rear-view camera mounting system so that it could be mounted above the bike rack and at a height and angle optimized for visualizing surrounding traffic, rather than for parking maneuvers.  Since this monitor can be on the whole time the ignition is on, rather than only when the transmission is in reverse, it will be possible to have two different camera angles displayed when in reverse (rear view mirror mount and entertainment system displays).  

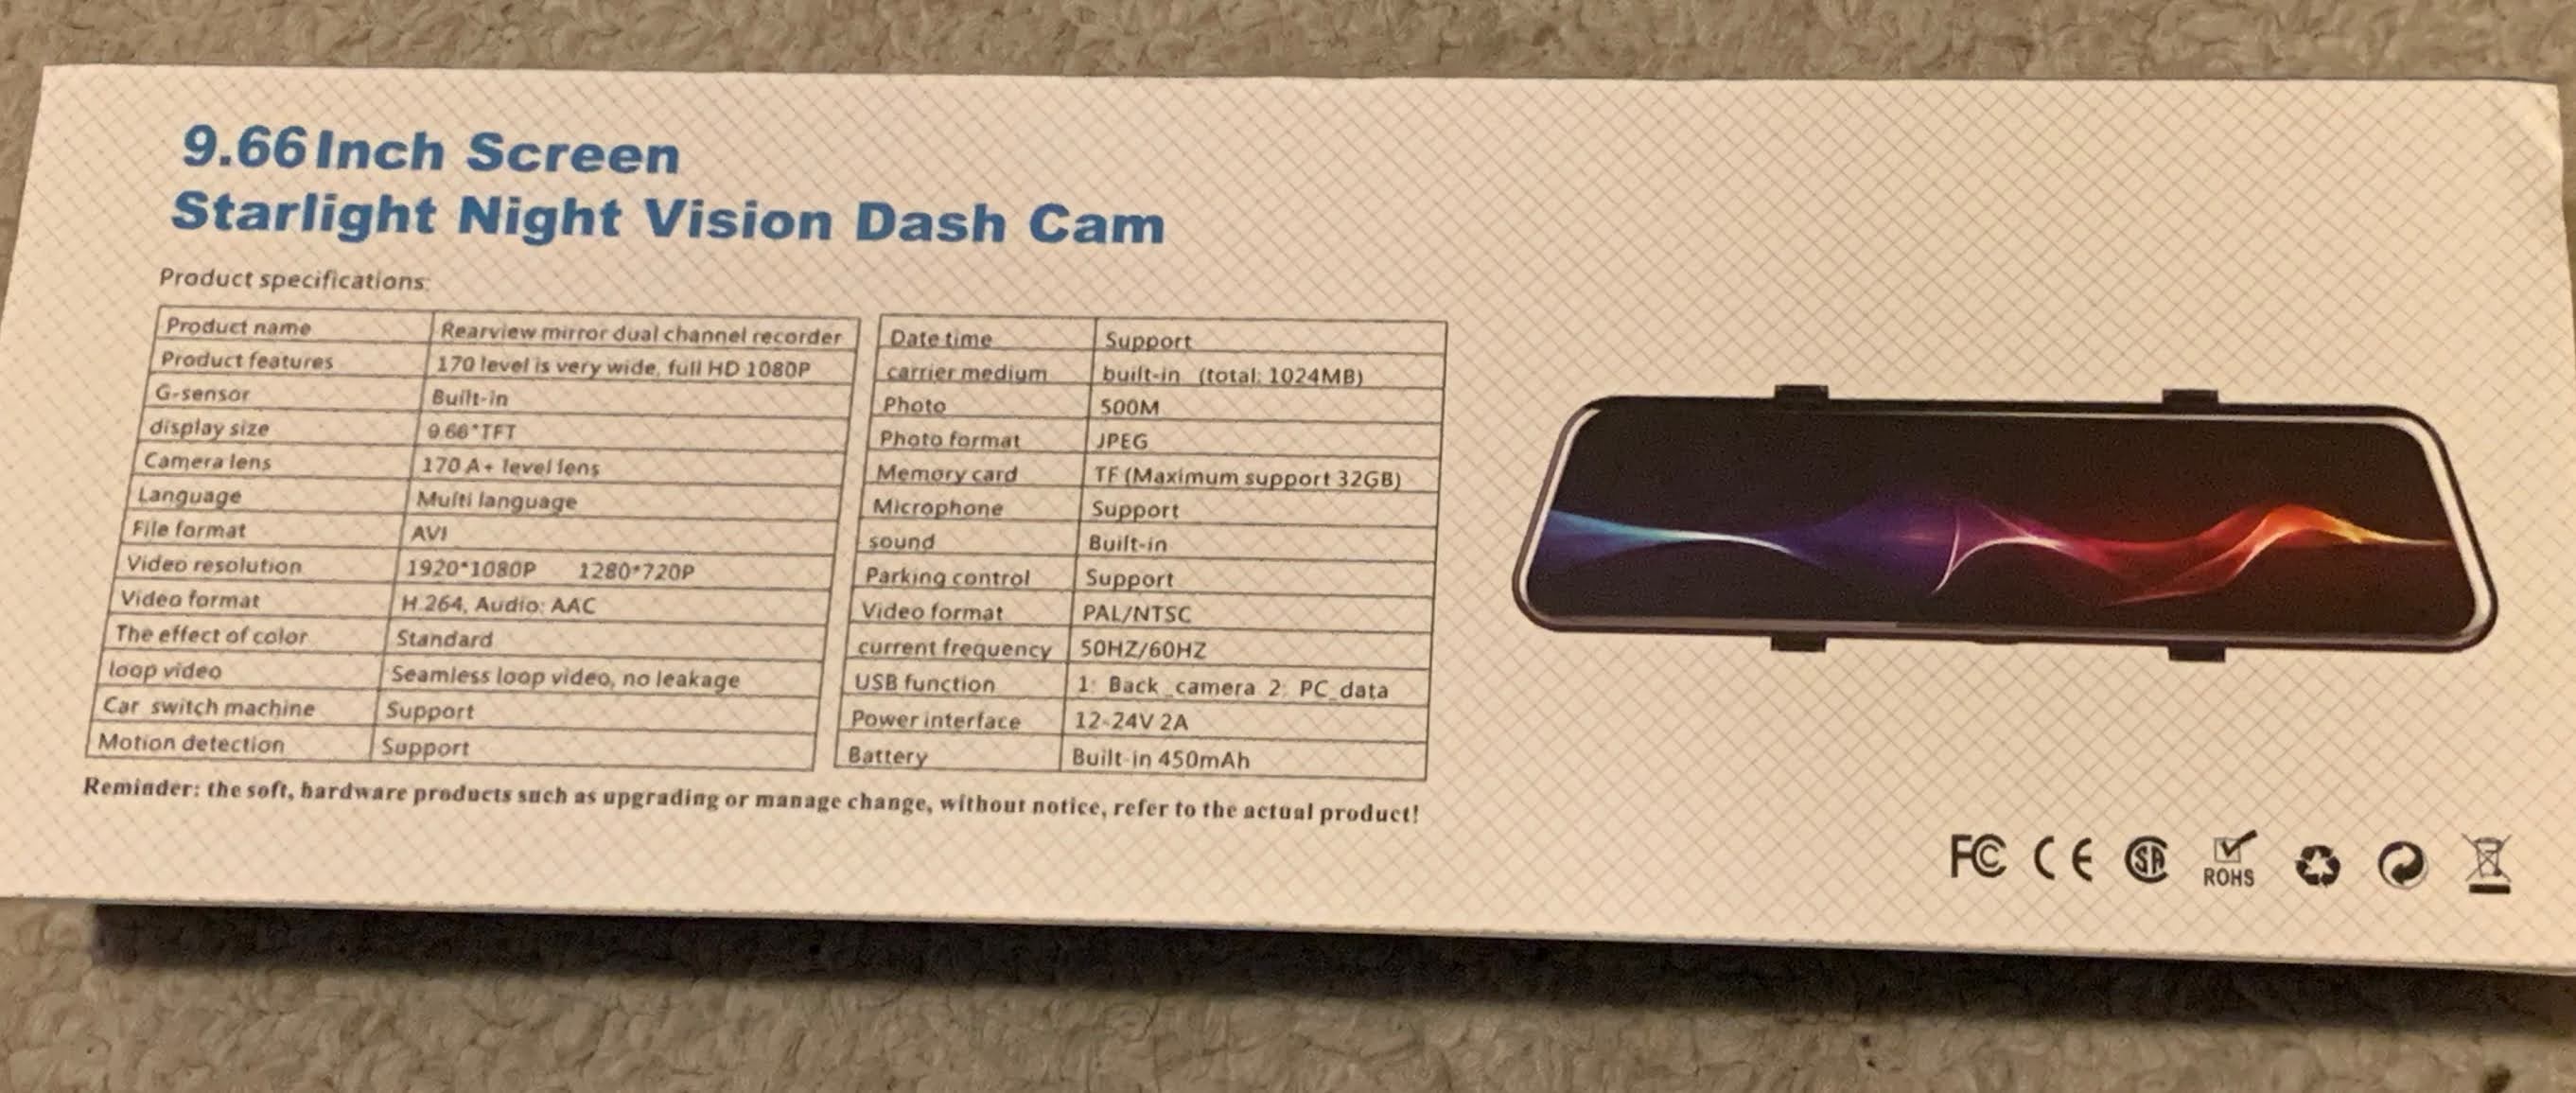
Since I wasn't 100% certain this would work for this application, I decided to start off with a cheap no-name 9.66" Starlight Night Vision Dash Cam display unit and rear view camera unit I found on Wish.com for under $100.  More reputable and undoubtedly better units are available for $200-400 elsewhere, but I figured I'd give this a try for a proof of concept experiment.  Now that I have had the system installed and working, I would recommend a better unit primarily because the lack of a touch screen and poor software quality, reliability and terrible user interface make the dash cam aspect of this particular unit unusable, but as a rear-view monitor, it works just fine.  


The Sprinter chassis rear view mirror is mounted below a module containing cameras for the Sprinter chassis lane departure detection camera and radar sensors for the frontal collision warning system, so the built in forward dash cam is largely obstructed.  I got around this by cutting the dash camera component out and mounting this on a fabricated metal bracket, but since the user interface for this unit is so poor and the dash cam recording software is so unreliable, I wouldn't waste your time worrying about this modification to the unit.  

The main issues in installing a true rear view monitor are providing power to the monitor at the rear view mirror position, and figuring out how to run the video and power cable to the camera unit on the rear of the RV.  

I ended up tapping power from the fusebox at the passenger footwell.  I ran this power around the base of the passenger seat and then up to the overhead console position behind the trim and fascia behind the passenger seat.  This proved simpler than blindly fishing wiring up the A-pillar, which is crowded with factory wiring harnesses and difficult to access without tearing out the entire headliner.  You do have to be careful to protect the power wire from chaffing from the tool box that lies over the fuse box and where the wire runs under the passenger floor mat.  

Running the video/power cable to the rear of the coach was more challenging.  I decided the most direct path would be to run the cable through the vertical fiberglas roof section where the View coach transitions from the cab-over bed section and the flat rear of the coach.  This requires removal of a few trim pieces and a ceiling panel forward of the air conditioner but access is actually pretty straight forward. An alternative would have been to run the wiring through the firewall at the front of the passenger foot well, and then down to the frame of the RV, and then back along the frame, and then back up to the back of the RV body.  This would have required at least 15' more cable run than going over the roof.  


Once through the vertical fiberglas roof section, I installed rigid plastic watertight conduit to run the cables through.  The conduit will provide ultimate protection against UV, rodents, tree branches and debris on the roadway.  I also used the same watertight rigid plastic conduit to run the license plate wiring up from the bottom to the middle of the RV where the license plate can be seen when bicycles are mounted on the bike rack.  

I was able to purchase a 10M extension video/power cable, and when this was added to the native video/power cable, it was just barely sufficient to reach the middle of the rear of the RV.  


When I first installed the system, it was interesting to play around with the dash cam, which could display the front camera and rear camera in various split displays or full width displays, but I soon ran into troubles with the dash cam running out of memory despite a 64GB microSD memory card, failure to format the microSD card, and inability to read any of the recorded files on any computers- all due to terrible software.  


And the user interface was practically unusable.  It required so much effort to try to figure out how to get it into the required mode, or to constantly reformat the memory card while driving, that I ended up pulling the memory card out to disable the dash cam recording functions, and left it simply on full screen rear view mode all the time.  

So in the end, I do have an intuitive rear view mirror display that works well to keep me aware of traffic behind me while driving.  All the other bells and whistles (dash cam functions) ended up being useless garbage due to terrible software, but for the price paid, I got what I needed and not one bit more.